
How to Sew French Seams: Step by Step
Enclose raw edges with two passes. Follow a straight-seam example with a 5/8-inch allowance, clear diagrams and troubleshooting checks.
In this guide
What a French seam does
A French seam hides both cut edges inside a narrow fabric enclosure. You sew once with wrong sides together, trim the edges, then turn the fabric and sew again with right sides together. The second line traps the raw edges. The right side is the face you want visible on the finished item; the wrong side is its reverse.
This lesson is a straight-seam practice method for lightweight woven fabric with a 5/8-inch total seam allowance. It uses a 3/8-inch first pass and a 1/4-inch second pass, as illustrated in the Sewing & Craft Alliance guideline. If your pattern specifies another construction or allowance, use its instructions; do not add this finish on top of an already completed plain seam.
When to use it—and when to choose another finish
Consider a French seam when a lightweight, unlined woven project needs enclosed edges. First practice on a stable woven scrap where you can see the two sides clearly. A slippery sheer is a more demanding first sample. Thick fabric can create a bulky enclosure; stretch seams, tight curves, pockets and zipper openings need construction-specific handling. This straight-seam lesson does not cover those adaptations.
Prepare your sample and measurements
- Two matching woven scraps with a straight edge long enough to practice guiding and pressing.
- A sewing machine, compatible needle and thread, pins or clips, ruler or seam gauge, sharp fabric scissors, iron and pressing surface.
- A removable mark identifying the right side of each scrap. Test the marking and pressing temperature on spare fabric first.
Check that the pattern allowance is included in your cut pieces. Our example begins with a 5/8-inch allowance, exactly 15.875 mm. Convenient machine-guide labels such as 16 mm are rounded; choose one measurement system for the entire sample rather than mixing approximate markings.
| Measurement | Distance | Measured from |
|---|---|---|
| First stitching | 3/8 in | Original cut edge |
| Trimmed allowance | About 1/8 in remaining | First stitching line |
| Second stitching | 1/4 in | New folded edge |
| Total allowance | 3/8 + 1/4 = 5/8 in | Original cut edge to final seam line |
Sew the French seam step by step
Start with wrong sides together
Put the reverse faces against each other, leaving the right sides visible on the outside. Align the cut edges without stretching them. Pin or clip, then sew a straight line 3/8 inch from that edge. Remove pins before the needle reaches them and secure the ends as appropriate for your sample.

Trim without cutting the stitches
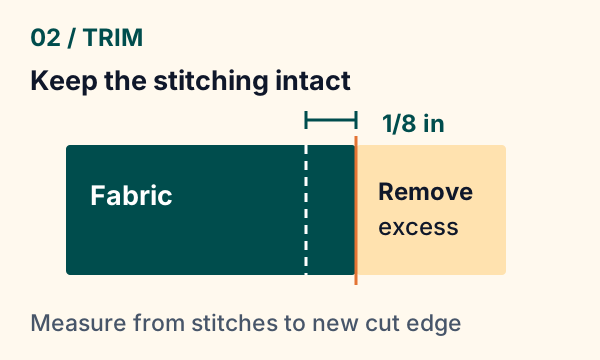
Press the seam open if the fabric permits, then trim both allowances so about 1/8 inch remains beyond the first stitching. Measure from the thread line, not from the original cut edge. Remove loose threads. Work slowly: a nick in the stitching can weaken the sample; do not hide it inside the next pass.
Turn and press the fold
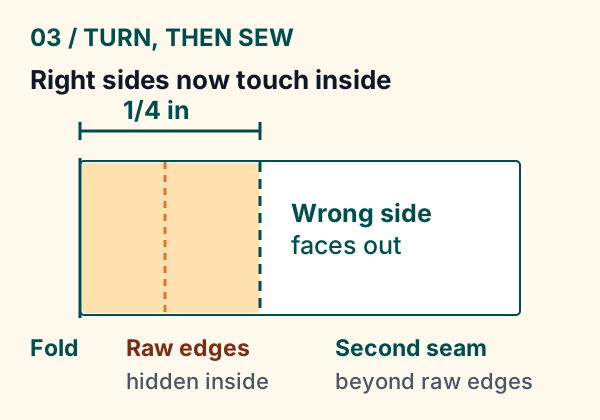
Open the pieces, then fold along the first seam so the right sides now touch. Roll the seam fully to the folded edge and press gently without dragging the fabric. The trimmed edges should lie inside the fold. Check the whole length: a fold that rolls to one side changes where the second pass lands.
Sew the second pass
Measure 1/4 inch from the new folded edge and sew through both layers. This distance must be wider than the trimmed material inside, so the raw edges remain enclosed. Keep the fold against your chosen guide; do not measure from an exposed raw edge or from a different machine mark halfway along.
Open, press and inspect
Open the joined pieces with the right side facing you and check the seam. Turn to the wrong side and press the enclosure to one side as the pattern directs. Look for escaped threads, puckers and an even enclosure. Do this before cutting or sewing the main garment.
Why trimming does not reduce the total allowance
The first stitch line becomes the fold. The second seam is another 1/4 inch inward from that fold, so its final position is 3/8 + 1/4 = 5/8 inch from the original edge. Trimming removes fabric outside the first stitches; it does not move either stitching line. On paper, mark those two positions before sewing if the arithmetic feels unclear.
For a 1/2-inch allowance, a different split may be possible, but both the first pass and enclosure width must be planned together. Do not reuse just one number from this example. See our seam allowance reference before adapting a pattern.
Fix common problems
| What you see | Likely check | What to do |
|---|---|---|
| Threads visible outside | Trim/fold/enclosure width | Open the affected second seam, remove stray fibers and check the fold before resewing. |
| Fabric puckers | Feed, tension or pressing | Test settings on matching scraps; support the fabric without pulling it through. |
| A bulky ridge | Fabric too heavy or trim uneven | Use a suitable lighter sample or a finish recommended for the project. |
| Finished piece too narrow | Combined stitching distances | Check both passes against the intended total; extra allowance taken in changes fit. |
Before using it on a project
Your sample should lie reasonably flat, show no raw threads on the right side and have an intact enclosed edge on the wrong side. Keep the sample with its two stitching distances written down. If it will be washed, check it after the care process allowed for that fabric. A practice result is more useful than assuming the finish suits every material.
Next, use the seam allowance calculator for rectangular cut dimensions, or check fabric grainline before laying out your main pieces. The calculator adds allowances; it does not choose the best seam finish.
Make room for the seam.
Calculate cut dimensions from finished dimensions and the seam allowances you choose.
Explore the planning toolSources & editorial notes
- Sewing & Craft Alliance: Seam Finishes, Part 2 — https://www.sewing.org/files/guidelines/11_230_seam_finishes_2.pdf
- Grainline Studio: French Seams on Various Seam Allowances — https://grainlinestudio.com/blogs/blog/french-seams-on-various-seam-allowances
- Editorial note: straight-seam instruction and original schematic diagrams checked against the cited construction sequence on 13 November 2026. No independent hands-on sample test is claimed.
