How to Sew an Invisible Zipper
Place the open zipper tapes right sides together with their fabric pieces, align each coil to the marked seam line and sew using a compatible invisible-zipper foot.

In this guide
Place the open zipper tapes right sides together with their fabric pieces, align each coil to the marked seam line and sew using a compatible invisible-zipper foot.
Result and equipment
This method installs a concealed coil zipper into an open seam before sewing the seam below it. Use the pattern, correct-length invisible zipper, compatible invisible-zipper foot, regular zipper foot for the lower seam, suitable needle/thread, ruler, marker, pins or basting thread and scrap fabric. Practice once in the same cloth and seam allowance when the garment fabric is costly or unstable. This lesson uses BERNINA Foot #35 as a documented groove example; another foot’s instructions may differ.
Prepare
Use the zipper length/type, seam allowance and fabric preparation your pattern specifies. Mark the opening end and seam line. Finish raw edges if required and stabilize stretchy edges only with an interfacing suited to the fabric. Check foot compatibility and needle position before sewing.
Install and check
Baste the first tape
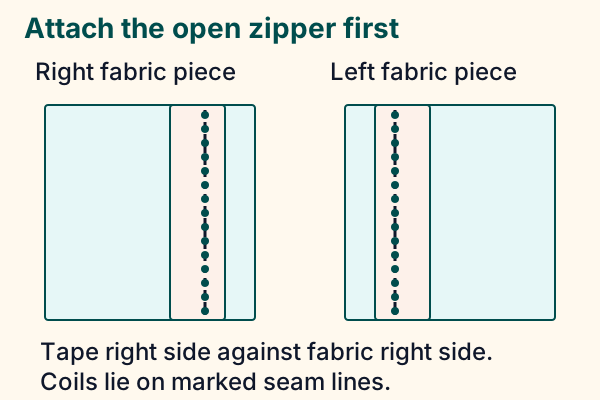
Open the zipper. Place the right side of the tape against the fabric right side, coil on the seam line. Position the top stops below the finished upper edge as directed. Do not stretch the opening.
Sew beside the coil
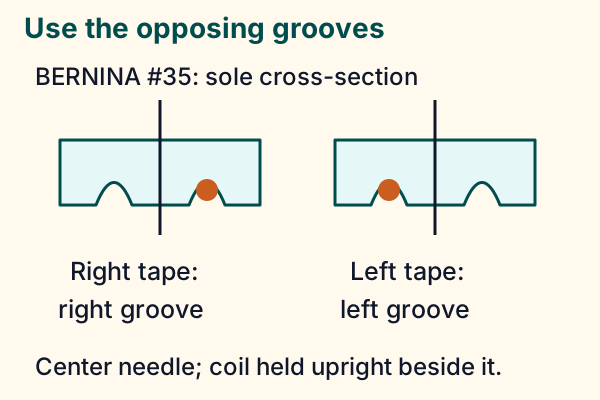
For BERNINA Foot #35, put the right tape’s coil in the right groove with center needle position; for another foot, use its own instructions. Check needle clearance by turning the handwheel, then sew close beside the upright coil, stopping before the slider blocks the foot. Do not sew over a stop or force the foot past the pull.
Match the second side
Close temporarily and mark matching garment seams on the second tape. Reopen, baste the second tape without twisting it, then sew from the top using the opposing groove. BERNINA #35 uses the left groove for the left tape.
Complete the lower seam
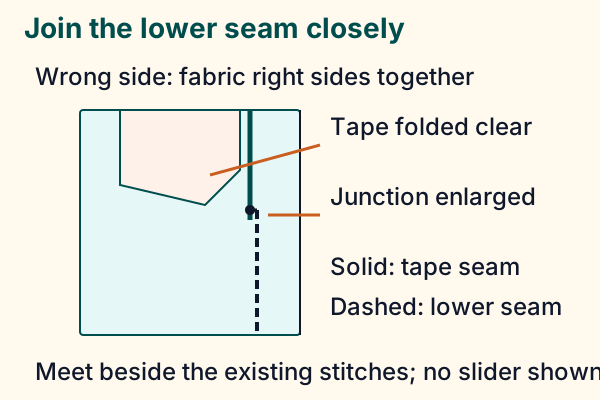
Close and test the zipper first. Put fabric right sides together and keep the zipper tapes out of the lower seam. With a regular compatible zipper foot, begin the lower seam close to where the zipper stitching ends and continue on the marked seam line below. Baste this junction if needed before permanent stitching; it should meet without a gap or tuck.
Test the opening
Open and close several times. Check matching seams, a smooth lower junction and free slider movement before finishing the top edge or lining.
Check alignment before the lower seam
With both tapes attached, close the zipper and lay the work flat without pulling. The fabric should meet at the opening, cross seams should match and the slider should move freely. If the zipper twists, or one side ends higher, unpick and rebaste the affected tape now. Finish the pattern’s top edge or facing after this check, keeping stitches and lining clear of the slider. Opening and closing the finished garment remains a final check, not a substitute for this intermediate test.
Avoid unnecessary heat
Do not assume every invisible zipper coil must be ironed flat. Follow the zipper maker’s preparation instructions; heat can damage the coil or garment fabric. A suitable foot can help roll the coil away from the needle while sewing. Keep pins out of the needle path.
If it puckers or sticks
Check for a stretched fabric edge or stitches catching the coil. Unpick only the affected section, rebaste and test on a scrap. Fixed seam-width and overlap rules do not suit every pattern and zipper length.
Make room for the seam.
Calculate cut dimensions from finished dimensions and the seam allowances you choose.
Explore the planning toolSources & editorial notes
- BERNINA / Susan Beck — Invisible Zipper Foot #35 — https://www.bernina.com/en-US/Learn-Create-US/Projects-Downloads/Accessory-Projects/Accessories-tips/Accessory-Spotlight-Invisible-Zipper-Foot-35/AccessorySpotlight-InvisibleZipper35.pdf
- Sources checked 13 November 2026. Original arithmetic and schematic teaching diagrams; hypothetical samples are identified. No independent hands-on craft testing, product performance testing or named expert review is claimed.