How to Sew a Button by Hand: Two or Four Holes
Anchor the thread at the marked position, sew through the button holes and fabric several times, then secure the thread on the wrong side.

In this guide
Anchor the thread at the marked position, sew through the button holes and fabric several times, then secure the thread on the wrong side.
Check the garment first
If replacing a button, compare the remaining buttons and buttonhole size. Check for a spare and note the original position before removing loose threads. A torn attachment area needs repair or reinforcement before another button is sewn onto it. These instructions cover sew-through buttons; a molded shank button uses its underside loop instead.
Prepare the tools
Use a hand-sewing needle that passes freely through the holes, matching thread, scissors, a marker and a small spacer such as a toothpick where extra clearance is needed. Work on a stable surface and keep needles/pins accounted for. Choose thread appropriate to the fabric and expected wear.
Locate the center accurately
Close and align the garment without pulling it tighter. Use the old stitching marks only if the previous position was correct. Mark the button center through the buttonhole opening, then reopen the garment so you stitch only the intended layer. Cut a manageable thread length, double it through the hand needle and knot the ends. Long thread tangles more easily and can abrade before the button is finished.
Attach a sew-through button
Mark and anchor
Mark the center with the garment correctly aligned. Thread the needle, knot the end and make a couple of small anchoring stitches where the button will sit.
Position the button
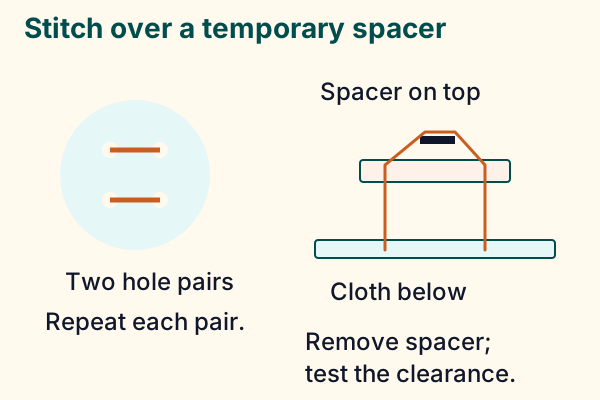
Place it over the mark. For a fastening button, lay a spacer across its top if clearance is needed so the stitching will not clamp it flat to the garment.
Sew the first pair of holes
Come from the fabric underside up through one hole, then down through the paired hole and fabric. Repeat enough to make a secure attachment without overfilling the holes or cutting into the cloth.
Complete four-hole buttons
For four holes, repeat through the other pair in a parallel or crossed arrangement matching the garment. Keep the button aligned while stitching.
Secure and test
Secure the thread on the underside with small stitches through the existing thread, then trim. Remove the spacer and lift the button gently to settle the slack. Fasten through the buttonhole and check that it closes without puckering or excessive slack.
Choose clearance for the closure
The temporary spacer prevents tight stitches from clamping a fastening button flat against the cloth. Its thickness should suit the buttonhole layer that must slide beneath the button. This method follows Purdue’s spacer-and-secure approach; it does not add a wrapped thread shank. A molded shank button is different: sew through the molded loop, using an appropriate separate method. Decorative buttons that never fasten may need less clearance.
Recognize a secure attachment
For a four-hole button, work one paired set of holes several times, then the other. Match the arrangement of the other buttons; six passes per pair is Purdue’s practice example, not a durability rule for all thread and fabric. Keep the stitches snug over the spacer without bending the button or puckering the cloth. Secure the thread into the existing stitches on the underside, avoiding a large hard knot. Test the actual buttonhole: the button should pass through, sit comfortably and resist a gentle pull without distorting the fabric.
If it loosens again
Inspect whether the thread broke, the cloth tore or the buttonhole is putting strain on the attachment. Repeating more stitches through damaged fabric is not a repair. Reinforce appropriately or seek a suitable alteration for a strained closure.
Machine attachment is a separate method with needle-clearance checks; this hand-sewing lesson does not require a machine or button foot.
Make room for the seam.
Calculate cut dimensions from finished dimensions and the seam allowances you choose.
Explore the planning toolSources & editorial notes
- Purdue Extension — Mini 4-H Sewing, printed p. 9 — https://extension.purdue.edu/county/montgomery/_docs/mini.sewing.pdf
- Sources checked 13 November 2026. Original arithmetic and schematic teaching diagrams; hypothetical samples are identified. No independent hands-on craft testing, product performance testing or named expert review is claimed.