
Seam Allowances: Common Values and Exact Conversions
Follow the allowance specified for the exact seam in your pattern.
In this guide
Follow the allowance specified for the exact seam in your pattern.
| Inches | Exact millimeters | Common rounded label |
|---|---|---|
| 1/4 | 6.35 | 6 mm |
| 3/8 | 9.525 | 10 mm |
| 1/2 | 12.7 | 13 mm |
| 5/8 | 15.875 | 15 or 16 mm |
| 1 | 25.4 | 25 mm |
What “standard” can mean
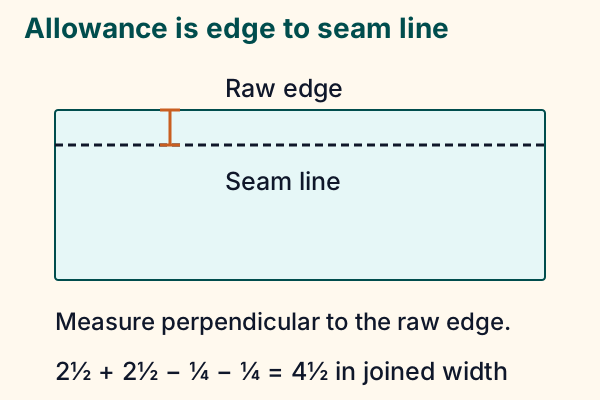
A ¼-inch allowance is common in quilt piecing and ⅝ inch appears in many garment patterns, but neither overrides the specific pattern. The table distinguishes exact inch conversion from rounded metric labels; ¼ inch and 6 mm differ by 0.35 mm. Decide which stated system controls instead of alternating rulers mid-seam. Measure perpendicular from raw edge to seam line, not along a diagonal.
Choose the controlling measurement
If a pattern is drafted in metric, follow its stated metric allowance. Check whether seam allowances are included before adding more. One project can specify different allowances at different seams. Rounded alternatives should not be switched midway through precision construction.
Add allowances to a rectangle
Cut dimension = finished dimension + allowances on the relevant edges. A 12-inch finished square with 1/4 inch on both edges of each dimension is cut 12.5 × 12.5 inches. An edge on a fold normally does not need a joining allowance. Hems, facings and enclosed seams require their own construction plan.
Test a piecing seam
Many quilt instructions use 1/4-inch seams. A scant seam can compensate for thread and folding on a particular setup, but it is not a fixed universal width. Sew a strip-set sample, press as planned and measure the result. Adjust the guide from that test.
A strip-set checkpoint
Take two accurately cut 2½-inch-wide strips and join their long edges with a chosen ¼-inch seam. Press in the intended direction and measure the combined width away from the ends: 2.5 + 2.5 − 0.25 − 0.25 = 4.5 inches. If it is narrower, investigate cut width, a too-wide seam or pressing/fold take-up before cutting more pieces. If it is wider, inspect whether the allowance is too narrow. The arithmetic assumes ideal flat geometry; the sample tells you whether the working setup reproduces it.
Keep the guide accurate
- Measure from the actual needle position.
- Use a compatible guide without obstructing moving parts or openings.
- Recheck after changing a foot or needle position.
- Do not trim fitting allowance away before checking the garment.
Use the allowance calculator for arithmetic and the French seam lesson for a two-pass method.
Make room for the seam.
Calculate cut dimensions from finished dimensions and the seam allowances you choose.
Explore the planning toolSources & editorial notes
- AQS — Seam allowance and sewing patchwork — https://www.americanquilter.com/wp-content/uploads/2025/09/lets-quilt-beginners-series-lesson3.pdf
- Sewing & Craft Alliance — Sewing with knits — https://www.sewing.org/files/guidelines/4_215_sewing_with_knits.pdf
- Sources checked 13 November 2026. Original arithmetic and schematic teaching diagrams; hypothetical samples are identified. No independent hands-on craft testing, product performance testing or named expert review is claimed.
