How to Make Quilt Binding: Straight-Grain Strips
Cut, diagonally join and fold straight-grain strips for double-fold quilt binding, with join loss included in the length plan.
In this guide
Make straight-grain double-fold quilt binding by cutting equal-width strips, joining their ends diagonally, pressing the joins open and folding the long strip in half. This lesson prepares the strip; attachment, mitered corners and the final connection around the quilt are separate steps.
Choose the binding construction
This guide covers double-fold binding made from straight-grain strips for straight quilt edges. A common cut width is 2.5 inches, but batting loft, seam depth and the desired finished width can require another size. Curved or scalloped edges may need bias binding. The number on a strip chart is not a guaranteed finished width.
Set up a sample before cutting the batch
Use quilting cotton or another backing-compatible binding fabric, cutting mat, rotary cutter or shears, long ruler, marking pencil, clips, sewing machine and iron. Start with a small quilt-sandwich scrap. Choose the attachment method and seam depth first, then test whether the folded strip reaches over the edge with enough overlap on the back. A higher-loft sandwich can consume more strip width. The following method makes a continuous double-fold strip; it stops before attachment and mitered corners.
Plan length and fabric
Perimeter = 2 × width + 2 × length. Add a deliberate reserve for corners and final joining; the calculator uses 20 inches. Diagonal strip joins consume length: for equal-width strips joined across a square overlap, each join uses approximately one strip width. Use actual usable WOF after selvages and check a sample join.
Worked cutting example
For a 50 × 65 inch quilt, perimeter is 230 inches; with a 20-inch reserve, aim for 250 inches. Seven strips each 40 inches long and 2.5 inches wide retain about 7 × 40 − 6 × 2.5 = 265 inches after six diagonal joins. Fabric length for the strips is 7 × 2.5 = 17.5 inches, which rounds up to 1/2 yard when buying in eighth-yard increments.
Check the strip-count threshold
A smaller original example shows why nominal length can mislead: a 40 × 50 inch quilt has a 180-inch perimeter. If you choose 12 extra inches, the target is 192 inches. Five 40-inch-long, 2½-inch-wide strips have 200 inches before joining, but four diagonal joins consume about 10 inches, leaving 190. That misses the target. Six strips leave about 240 − 12.5 = 227.5 inches before small end losses. Measure the completed strip and keep the chosen closing-method reserve intact. More reserve is not a substitute for accounting for join loss.
Make the binding
Cut consistent strips
Square the fabric and cut strips at your tested width. Remove selvages and keep a count. Use rotary-cutting tools according to their safety instructions.
Arrange a diagonal join
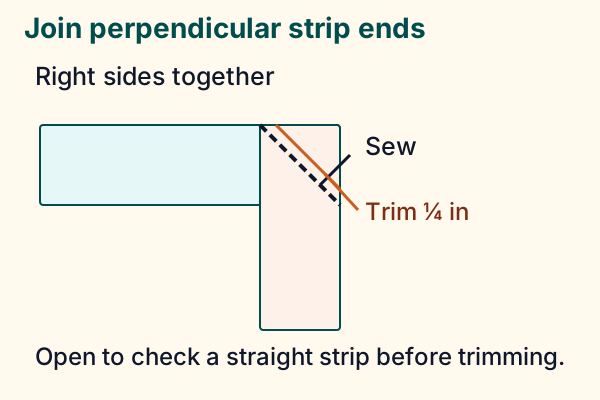
Place two strip ends right sides together at a right angle, overlapping a strip-width square. Mark a diagonal across that overlap that will open into one straight strip.
Sew and verify before trimming
Stitch the diagonal, unfold temporarily and check that the strips form a straight continuous length without a twist. Then trim the excess on the outside of the seam to leave a ¼-inch allowance and press the join open. The diagonal must connect the two overlap corners that release a straight strip; the other diagonal folds the ends the wrong way.
Join the remaining strips
Repeat and measure the actual continuous length. Keep joins away from likely corner positions when possible.
Fold and test
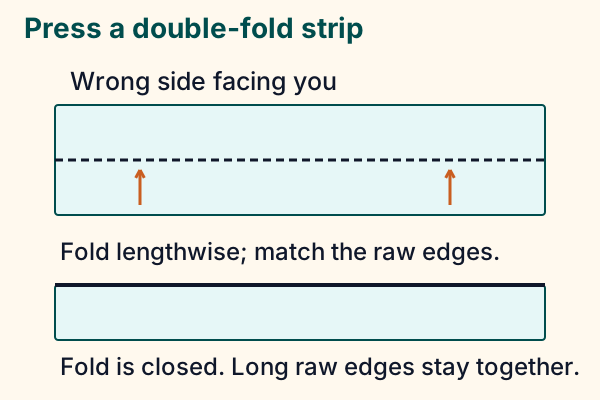
Fold lengthwise wrong sides together and press without stretching. Test on a scrap quilt sandwich with the intended attachment seam to ensure the folded edge covers the reverse stitching.
If the strip fails the sample
A twisted join should be unpicked before trimming. An offset edge can come from an inaccurate overlap, wrong diagonal or drifted seam. Recut damaged ends and include the new length loss in the count. Press seams open to spread bulk, then press the long fold without pulling the bias in the diagonal joins. Coil the prepared binding loosely and keep its measured length and cut width with the quilt notes. For attachment, choose a complete corner and closing method such as the linked Sewing & Craft Alliance lesson; its final connection uses tucking, a separate operation from the diagonal joins used to make these strips.
Before attaching
Measure the trimmed quilt rather than a nominal pattern size. Leave tails for the final join and follow a full corner/attachment method. This lesson prepares binding; it does not imply that a chosen strip width automatically fits every quilt edge.
Use the binding calculator and grainline reference for the cutting plan.
Plan beyond the quilt top.
Compare backing layouts with your fabric width, seam allowances and chosen overage.
Explore the planning toolSources & editorial notes
- AQS — Binding cuts — https://www.americanquilter.com/the-final-step-binding-cuts-2/
- AQS — Quiltmaking Essentials — https://www.americanquilter.com/wp-content/uploads/aqsquilt-images/2018/01/AQS-Quiltmaking-Essentials.pdf
- Sewing & Craft Alliance — Binding a quilt — https://www.sewing.org/files/guidelines/9_240_binding_a_quilt.pdf
- Sources checked 13 November 2026. Original arithmetic and schematic teaching diagrams; hypothetical samples are identified. No independent hands-on craft testing, product performance testing or named expert review is claimed.