Flying Geese Four at a Time: Cutting and Assembly
The four-at-a-time method uses one large square and four small squares.
In this guide
The four-at-a-time method uses one large square and four small squares.
| Finished height × width | One large square | Four small squares | Unfinished goose |
|---|---|---|---|
| 1.5 × 3 inches | 4.25 inches | 2.375 inches | 2 × 3.5 inches |
| 2 × 4 inches | 5.25 inches | 2.875 inches | 2.5 × 4.5 inches |
| 3 × 6 inches | 7.25 inches | 3.875 inches | 3.5 × 6.5 inches |
Read the units before cutting
This lesson makes four matching geese with a standard finished height-to-width ratio of 1:2. Finished means after the outer ¼-inch assembly seams are sewn; unfinished includes them. For finished height H, the traditional four-at-once cuts are one large square of 2H + 1¼ inches and four small squares of H + ⅞ inch. The unfinished rectangle is H + ½ by 2H + ½ inches. These formulas are independently written arithmetic for this method, not permission to resize only one part of another method.
Use one coordinated method
The formula assumes a 2:1 finished rectangle and a tested quarter-inch piecing setup. “No waste” is a common method name, not a promise of literally zero offcuts, dog ears or accuracy trimming. If using oversized units, use coordinated large/small cuts rather than adding an arbitrary amount to only one square.
Set up the trial
Use two contrasting quilting fabrics, ruler, marking pencil, cutting mat and cutter or shears, pins, machine and iron. Cut the large square from the goose fabric and the four small squares from the sky fabric. Mark diagonals on the wrong sides of all small squares. Test your quarter-inch setup first: the cited method uses a scant ¼ inch on the first paired seams. Fabric taken up by the fold and thread can affect the result.
Make one test set
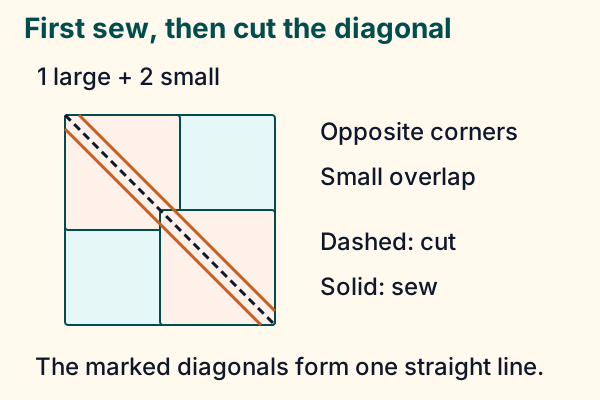
Position two small squares
Mark their diagonals and place them right sides together on opposite corners of the large square. They overlap slightly at the center; the marks form one continuous diagonal.
Sew and separate
Stitch on both sides of that line using the method’s quarter-inch setting. Cut on the diagonal and gently press the small triangles away.
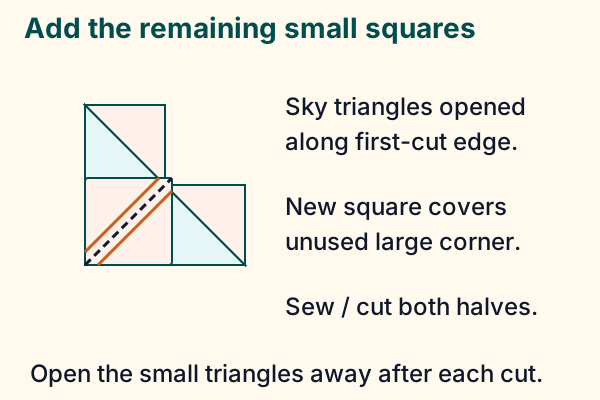
Add the other squares
Place one remaining square on the unused large corner of each intermediate unit. Sew on both sides of its diagonal and cut on the line.
Inspect four units
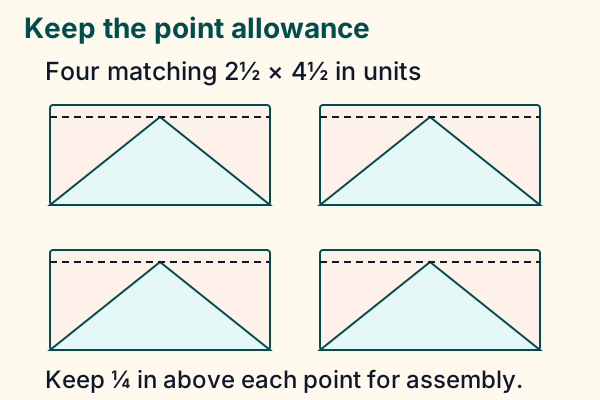
Open and press without stretching. Remove dog ears and measure the unfinished units. Preserve the allowance beyond the goose point so assembly does not cut it off.
Measure the result before cutting the rest
The 2 × 4 inch finished example must measure 2½ × 4½ inches before it enters the block. Center the goose apex and preserve ¼ inch from its point to the top raw edge. Trim dog ears, not the point allowance. If the rectangle is too small, check the cut sizes and seam before repeating; trimming cannot make it larger. If an apex is off-center, inspect the first diagonal alignment and equal corner placement. Press down and lift rather than dragging across the fresh bias edges.
Check batch quantities
Make one set before cutting valuable yardage. Directional prints can rotate within units, and a too-wide seam can leave a unit undersized. For counts not divisible by four, plan the spare units. Keep finished and unfinished measurements clearly labeled on the cutting sheet.
Plan enough complete batches
For 10 desired units, ceil(10 ÷ 4) = 3 batches. Cut three large and twelve small squares to make twelve geese, leaving two planned spares. Keep color pairings together. The method can turn directional prints in different directions; make one whole set before deciding that a one-way motif will work. If the test needs more trimming room, choose a complete documented oversized method instead of adding an arbitrary amount to only the sky squares.
Plan beyond the quilt top.
Compare backing layouts with your fabric width, seam allowances and chosen overage.
Explore the planning toolSources & editorial notes
- Quilters Unlimited — Flying Geese Units, two methods — https://www.quilttallahassee.com/wp-content/uploads/2018/03/Flying-Geese-Units-two-methods.pdf
- AQS — Seam allowance and sewing patchwork — https://www.americanquilter.com/wp-content/uploads/2025/09/lets-quilt-beginners-series-lesson3.pdf
- Sources checked 13 November 2026. Original arithmetic and schematic teaching diagrams; hypothetical samples are identified. No independent hands-on craft testing, product performance testing or named expert review is claimed.