
Knit vs. Woven Fabric: Stretch and Sewing Tests
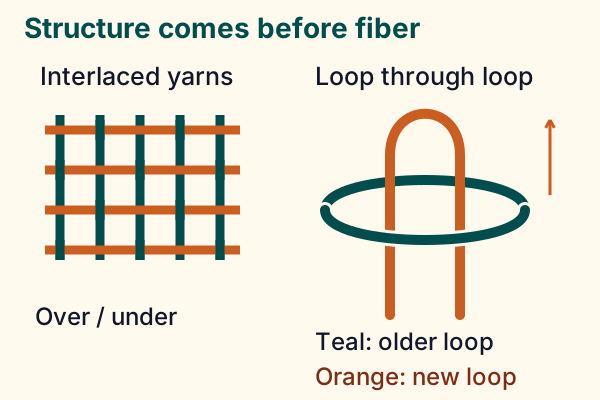
Knits use intermeshed loops and wovens use interlaced warp/weft yarns.
In this guide
Knits use intermeshed loops and wovens use interlaced warp/weft yarns.
| Check | Knitted fabric | Woven fabric |
|---|---|---|
| Structure | Intermeshed loops | Warp/weft interlacing |
| Stretch | Often stretches; measure both directions | Can stretch through bias, elastane or construction |
| Pattern match | Required stretch and recovery | Required drape, weight and any stretch |
| Needle | Test jersey/stretch as appropriate | Test universal or suitable specialized point |
| Edges | Can curl, run or fray | Often requires a suitable finish |

Identify a sample before choosing the pattern
Use a magnifier if needed to inspect the fabric away from a cut edge. A plain woven shows crossing yarn systems; a jersey knit shows linked loops with lengthwise columns, called wales. Fiber content is a different question: cotton, wool and synthetics can appear in either construction. Curling or fraying can be clues but are not decisive tests, because finish and structure change the edges. When a listing is unclear, request the actual construction and stretch information rather than guessing from a fabric name.
Measure stretch and recovery
Mark a relaxed interval, then extend it gently in the direction the pattern specifies. Extension percent = (stretched length − relaxed length) ÷ relaxed length × 100. A 10 cm interval extending to 12.5 cm has 25% extension. Release it and see whether it returns: extension and recovery are separate. Do not pull a sample to damage to obtain a larger number.
Use the intended construction
A pull-on knit garment may rely on stretch to pass over the body; a stable woven substitution may not work. A soft knit may fail to hold the structure expected in a woven design. Compare the pattern’s fabric requirements and sample the actual material.
Compare both directions and the relaxed state
Use the pattern’s stretch gauge or required interval, leaving enough sample beyond the marks to grip. Measure across the width and along the length separately when both matter. In the hypothetical 4-to-5-inch example, extension is 25%; if the sample stays longer than 4 inches after release, that is incomplete recovery even though it reached the required extension. For a fitted garment, insufficient recovery can matter as much as insufficient stretch. Do not apply a knit pattern’s negative ease to a stable woven without redesigning the fit and entry opening.
Test the seam
Use the planned layers and thread. Choose a needle compatible with your machine and fabric and a seam that allows the required movement. A narrow zigzag or suitable stretch stitch is one option for many knits, but its settings need a scrap test. Neither one ballpoint size nor one sharp point works for every material.
Handle without distorting
Identify the lengthwise structure, support pieces during cutting and avoid stretching edges during sewing. Follow nap instructions and pretest washing/pressing. No construction guarantees non-fraying edges or a fixed percentage of stretch.
See grainline and bias and needle selection.
Measure before the first cut.
Estimate yardage from your required dimensions, fabric width and chosen shrinkage allowance.
Explore the planning toolSources & editorial notes
- BERNINA — Woven grainline — https://www.bernina.com/bernina/media/BNZ/Projects/Grainline.pdf
- Sewing & Craft Alliance — Sewing with knits — https://www.sewing.org/files/guidelines/4_215_sewing_with_knits.pdf
- SCHMETZ — Needle Guide — https://www.schmetzneedles.com/pages/needle-guide
- Sources checked 13 November 2026. Original arithmetic and schematic teaching diagrams; hypothetical samples are identified. No independent hands-on craft testing, product performance testing or named expert review is claimed.