How to Fix a Dropped Knit Stitch
Secure a loose loop, rebuild a plain stockinette column and check the stitch mounting before continuing.
In this guide
A plain stockinette dropped stitch can often be rebuilt by drawing each horizontal ladder strand through the live loop, one row at a time. First secure that loop so it cannot run farther. These directions cover an isolated interior knit column without shaping; lace, cables, dropped edge stitches and broken yarn need a different diagnosis.
Identify what actually happened
Lay the work down without stretching it. A dropped stitch is a loose loop at the bottom of an opening, with horizontal strands above it where the column has unraveled. Put a locking marker or a smooth scrap-yarn loop through that live loop immediately. A hole without a loose loop may be an accidental yarn-over or an intentional increase; do not dismantle a sound column to fix the wrong problem. Compare both sides and count stitches before choosing a repair.
Gather the small repair tools
Use a crochet hook that fits through the loop without splitting the yarn, a spare needle or marker, and good light. For a valuable or complex project, first practise on a plain sample: release one interior stitch for two rows, catch it with a marker, and rebuild it. Bring the dropped column to the working needle tips by knitting up to it if needed. Do not add a new stitch to the row to replace the missing one; that leaves the original ladder unrepaired.
Ladder up with the knit side facing you
Arrange the loop and bars
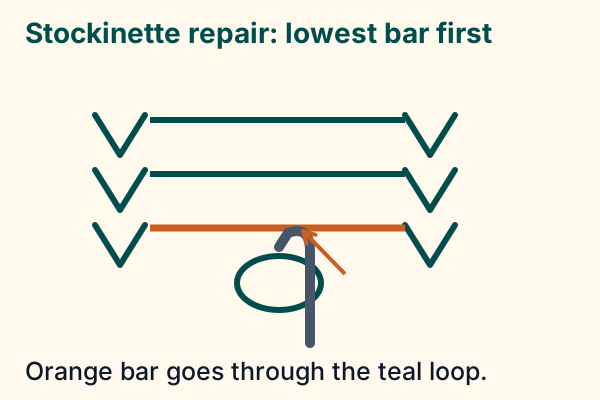
Turn the smooth V side toward you. Keep the live loop below the ladder bars and put the hook through it from front to back. Remove the safety marker only after the hook holds the loop securely. Identify the lowest unused bar directly above it.
Rebuild one row
Place that lowest bar behind the hook, catch it in the hook head and draw it forward through the live loop. The old loop drops around the new one. You have used one bar and rebuilt one row; the next higher bar remains unused.
Continue without skipping bars
Repeat upward, taking the next lowest unused bar each time. Do not catch two bars together or reach over a bar. Pause to check the new V in the repaired column and compare it with the neighboring stitches. Keep the hook loop similar in size to its neighbors.
Return the final loop
When every required bar has been used and the loop reaches the current row, return it to the left needle. For the usual Western mounting in this lesson, its right leg sits in front of the needle. Match the neighboring stitches and ensure the legs are not crossed. Remove repair markers, count again and continue the pattern.
Check for the two common hidden errors
A horizontal bar still spanning the repaired column means a row was skipped. Unevenly tight Vs with an unexpected fold can mean two bars were pulled through together. Secure the top loop, let only the repaired column down to the mistake, and repeat with the strands in order. A crossed V suggests a twisted loop; inspect how it was returned to the needle before knitting it. Do not pull a tight repair hard to disguise it.
Redistribute slack and know when to stop
Small differences in tension may settle as you gently move slack through neighboring stitches with a blunt needle tip, then finish the sample as its label permits. A single ladder repair in garter requires alternating knit and purl structures; repeating this stockinette motion for every bar makes a different fabric. A column containing an increase, decrease, cable or lace crossing cannot be reconstructed merely by consuming bars in order. Secure the loose loops and follow a suitable pattern-specific repair or undo to a known sound row.
Before putting the project away, move stitches onto the circular cable or use appropriate point protectors so loops cannot slide off the tips. Record where you stopped; the repair restores structure but does not identify your current pattern row automatically.
Plan with your gauge.
Estimate cast-on stitches and compare project width using your finished swatch.
Explore the planning toolSources & editorial notes
- DROPS Design: How to pick up a knitted stitch — https://www.garnstudio.com/lesson.php?cid=19&id=9
- Purl Soho: Knit Stitch (dropped-stitch response) — https://www.purlsoho.com/create/knit-stitch/
- Editorial review: primary sources accessed 13 November 2026; original practice examples and simplified schematics. No independent hands-on test or named expert review is claimed.