How to Count Rows in Knitting
Count stockinette, garter and ribbing with clear cast-on, marker and live-needle boundaries.
In this guide
To count knitting rows, follow a single column and identify your lower and upper boundaries before adding numbers. In stockinette the knit-side stitches look like Vs; in garter, one complete ridge interval represents two worked rows. Counting a finished measurement span and counting all worked rows on live needles use different boundaries, so write down which task you are doing.
Set up a reliable count
Use good light, a blunt needle tip, removable markers and a note of the pattern instruction. Lay the fabric flat without pulling lengthwise. Select a central column away from shaping and selvages. Find the cast-on or a marker placed in a known completed row. Do not count the cast-on foundation as an additional worked row in the ordinary convention used here; if the pattern defines its setup row differently, follow that definition.
Stockinette: total worked rows
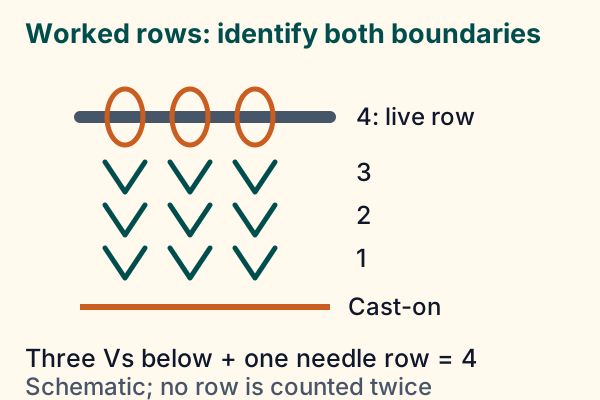
On the smooth side, trace one vertical column upward. Touch each V once rather than counting both legs as separate stitches. For a total count up to the current needle, include the latest worked row represented by the live loops if your below-needle count has not already included it. For example, three completed Vs clearly below the needle plus the latest row on the needle represent four worked rows in the schematic. Do not add the needle row twice. A partly worked row has different totals on its worked and unworked sections; finish it or record that partial state separately.
Stockinette: rows inside a measured span
For row gauge, place a ruler over a dry central area, choose exact lower and upper boundaries and count the row intervals between them. The loops on the needle do not belong to a 10 cm measurement span located entirely below the needle. Move pins or a contrasting thread to the boundaries if the Vs are hard to distinguish. Count over the whole measured span, not one centimeter multiplied from a tiny uncertain count.
Garter: use ridges, then inspect the ends
A full garter ridge interval comprises two rows, but the foundation and current top can expose an incomplete pair. Count complete two-row units from a known marker, then add any remaining worked row after checking the top structure. Six complete ridge intervals account for twelve rows; if one additional row was worked, the total is thirteen. Do not simply double every raised bump you can see at the cast-on or needle edge. A small sample with a marker after every second row is useful for learning the relationship.
Ribbing and repeated patterns
For ribbing, spread the fabric only enough to expose one knit column and count up that column. Do not jump sideways to another rib or stretch the sample while measuring gauge. For a cable or lace panel, use an adjacent plain column or a marker in the last known repeat row. Track the pattern-row number separately from total rows: finishing three eight-row repeats gives twenty-four repeat rows, before any setup rows or partial repeat are added.
Use a marker to settle the arithmetic
If a marker is in completed row 20 and you have worked fourteen further rows, the total is 34. Work six more to reach 40. Count only rows above the marker; do not include row 20 again. Decide whether a counter displays the row just finished or the next one to work, and note it on the pattern. When matching sleeves, count both from the same shaping point and also compare actual dry length; equal row totals can differ in length if gauge changed.
If two counts disagree, place markers every ten rows and recount each interval from both directions. For a gauge measurement, use the knitting gauge calculator only after confirming the counted span and units.
Plan with your gauge.
Estimate cast-on stitches and compare project width using your finished swatch.
Explore the planning toolSources & editorial notes
- Lion Brand / Heather Lodinsky: Counting Your Rows — https://www.lionbrand.com/community/blog/the-ups-and-downs-of-knitting-counting-your-rows/
- Editorial review: primary sources accessed 13 November 2026; original practice examples and simplified schematics. No independent hands-on test or named expert review is claimed.