
Knitting Needle Sizes: Metric and US Reference
Match knitting needle diameters in millimeters to published US labels, with ambiguous sizes and measuring limits explained.
In this guide
Use the millimeter diameter to match a knitting needle, then use its US marking as a secondary label. Letters and numbers vary between manufacturers. The reference below lists the Craft Yarn Council’s published metric/US associations; a dash means that this source supplies no US marking at that diameter, not that the tool cannot exist.
| Diameter (mm) | US marking |
|---|---|
| 1.5 | 000 |
| 1.75 | 00 |
| 2 | 0 |
| 2.25 | 1 |
| 2.75 | 2 |
| 3 | — |
| 3.125 | 3 |
| 3.25 | 3 |
| 3.5 | 4 |
| 3.75 | 5 |
| 4 | 6 |
| 4.25 | 6 |
| 4.5 | 7 |
| 5 | 8 |
| 5.25 | 9 |
| 5.5 | 9 |
| 5.75 | 10 |
| 6 | 10 |
| 6.5 | 10½ |
| 7 | — |
| 8 | 11 |
| 9 | 13 |
| 10 | 15 |
| 12.5 | 17 |
| 12.75 | 17 |
| 15 | 19 |
| 19 | 35 |
| 25 | 50 |
| 35 | 70 |
What the columns tell you
Millimeters describe diameter, not tool length or stitch gauge. US letters and numbers are names for sizes, not a calculation scale: US 8 is not 8 mm, and a difference of one US number does not mean a one-millimeter change. Multiple metric entries can share a US label. These are published associations for identification, not evidence that tools with the same letter or number are physically identical.
Read an actual pattern and package
Start with the pattern’s millimeter value. Find that exact value on the package or manufacturer’s size chart, and check it again on the tool if marked. For example, US 6 appears at both 4 and 4.25 mm in the source chart; choose by the pattern’s stated diameter rather than treating the two as the same shaft. If the pattern supplies only an ambiguous US label, consult the publisher or its original materials list before buying a replacement.
Identify an unmarked tool
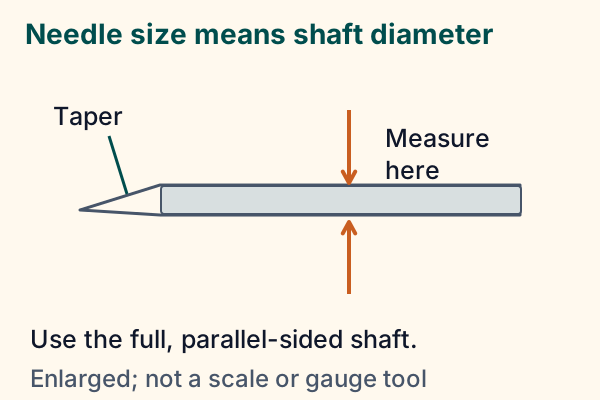
Use a gauge designed for the tool and its size range. Slide the cylindrical shaft through an appropriate needle-gauge hole without forcing it. The needle tip enters smaller holes before the full shaft does, so measuring only the taper gives the wrong answer. A gauge may not include every intermediate metric size. If the marking and gauge disagree, check for wear, coatings and gauge tolerances rather than silently relabeling the tool.
Separate size identification from fabric gauge
The right marked size is only the starting tool. Make a sample larger than the measuring area in the project’s actual stitch pattern, finish it as the yarn label and pattern permit, then measure a central span without stretching. More stitches in a fixed width mean smaller stitches; trying a larger diameter may help. Fewer stitches mean larger stitches; try a smaller diameter. Repeat the sample, because tension and construction can change the outcome. Check row gauge separately; a correct stitch gauge does not guarantee the required length.
Scope and exceptions
This chart does not convert every historical UK/Canadian needle number or guarantee every brand’s intermediate sizes. For vintage instructions, look for a publisher or maker chart tied to that exact numbering system. Straight, circular and double-pointed needles may share a shaft diameter while having different lengths and jobs. If substituting materials or a new brand mid-project, compare washed samples before continuing a fitted piece. Keep the diameter, manufacturer and sample measurements in your project notes so the choice is reproducible.
Next, use the knitting gauge calculator to interpret a measured sample. The calculator cannot identify a tool from its US marking or replace a pattern’s shaping instructions.
Plan with your gauge.
Estimate cast-on stitches and compare project width using your finished swatch.
Explore the planning toolSources & editorial notes
- Craft Yarn Council: Hooks & Needles — https://craftyarncouncil.com/standards/hooks-and-needles
- Editorial review: primary sources accessed 13 November 2026; original practice examples and simplified schematics. No independent hands-on test or named expert review is claimed.