How to Make a Quilt Backing: Width, Seams and Overage
Choose a backing compatible with the quilt top and quilting method, confirm required overage with the quilter, then plan one or more panels from the measured usable fabric width.
In this guide
Choose a backing compatible with the quilt top and quilting method, confirm required overage with the quilter, then plan one or more panels from the measured usable fabric width.
Get the required canvas size
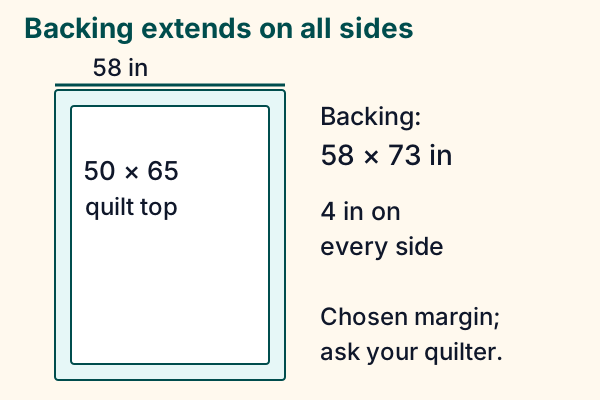
Measure the completed top. Ask the person doing the quilting for the backing and batting margins before buying fabric. A frame-loading method can need a larger margin than a small hand-quilted project. Backing width = top width + twice the per-side margin; calculate length the same way.
Tools and preparation
Have a tape, long ruler or square, marking tool, cutting equipment, sewing machine and iron available. These instructions assemble a backing, ready for your chosen quilting method; they do not teach machine loading or a complete basting system. Check whether the quilter wants the layers supplied separately. Prepare compatible materials according to their labels, then measure rather than relying on nominal bolt width.
Choose the fabric deliberately
Compare weight, care and color with the top. A strongly contrasting backing can show through light fabric or highlight thread/tension differences. A decorative pieced back can add seams and bulk. Wideback fabric can avoid joins, but its actual usable width after selvages and prewashing still matters. Follow label and quilter instructions for preparation.

Plan the layout
Measure usable width
Remove or reserve selvages and account for any joining allowance. A nominal bolt width is not the same as the width retained in the assembled back.
Compare orientations
Sketch seams parallel to the quilt length and seams across it. Compare panel lengths, directional prints, quilter restrictions and the fabric grain before choosing the lowest-yardage layout.
Cut and join
Square each panel, use a consistent seam allowance suitable for backing, and avoid leaving selvages trapped in the seam. Check that the assembled width still covers the required canvas.
Press and measure
Press seams open if that is the intended method and ensure the back is smooth, square and large enough in both directions. Remove stray threads.
Prepare for layering
Place backing wrong side up, then batting and top. Smooth without stretching the back tight; follow the chosen basting or frame-loading instructions.
A two-panel calculation
Suppose the required backing is 58 × 73 inches and prepared cloth has 40 inches usable width. Two panels cut 73 inches long can be joined along their long edges. With a chosen ½-inch allowance on each panel, joined width is 40 + 40 − 1 = 79 inches. Square and trim to the required width, keeping the top centered within the eventual backing. Purchase length is at least 2 × 73 = 146 inches, or 4.056 yards; rounding to the next eighth gives 4⅛ yards before any extra preparation or print-match reserve. This is one layout, not a minimum-yardage guarantee. A rotated layout may use less fabric, but only if print direction and quilter requirements allow it.
Worked wideback example
A 50 × 65 inch top with a chosen 4-inch margin on each side needs 58 × 73 inches of backing. If 73 inches fits across the measured wideback, the 58-inch dimension can run along the bolt: 58 ÷ 36 = 1.611… yards. Rounding upward to an eighth yard gives 1⅝ yards. Extra shrinkage, squaring or print alignment may increase the purchase.
Before sending to a longarm quilter
- Confirm the exact required margin and acceptable seam orientation.
- Mark the top of directional backing when requested.
- Check that no backing seam creates excessive bulk under top seams.
- Provide a smooth, squared back without pins or unrelated attachments.
Use the backing calculator to compare its stated conservative usable-width layouts; check the actual fabric and quilter requirements before cutting.
Plan beyond the quilt top.
Compare backing layouts with your fabric width, seam allowances and chosen overage.
Explore the planning toolSources & editorial notes
- The Quilters’ Guild — Layering your quilt — https://www.quiltersguild.org.uk/pages/quilt-making-faq/layering-your-quilt
- AQS — Quiltmaking Essentials — https://www.americanquilter.com/wp-content/uploads/aqsquilt-images/2018/01/AQS-Quiltmaking-Essentials.pdf
- Sources checked 13 November 2026. Original arithmetic and schematic teaching diagrams; hypothetical samples are identified. No independent hands-on craft testing, product performance testing or named expert review is claimed.